The Ultimate Guide to Perfectly Tangy Lemon Bars: A Zesty Dessert You’ll Make Again and Again
Have you ever bitten into a store-bought lemon bar only to be met with a cloyingly sweet, artificial flavor and a soggy crust that crumbles in disappointment? If so, you’re not alone. The quest for that perfect balance of buttery shortbread and bright, citrusy curd can feel elusive—until you make them from scratch at home. Homemade lemon bars aren’t just a treat; they are a triumph of texture and taste. By controlling each ingredient, you can achieve a dessert that is crisp, creamy, and intensely refreshing. Whether you’re a seasoned baker or a complete beginner, mastering lemon bars will elevate your dessert game. And when you pair them with a complementary lemon dessert like Raspberry Coconut Magic Bars, you create a whole citrus-inspired spread that wows every crowd. Let’s dive into the science and art of making the perfect lemon bars.
Ingredients & Kitchen Tools
For the Crust
– 1 ¾ cups all-purpose flour – Provides structure; sift for a tender crumb.
– ½ cup powdered sugar – Adds sweetness and a melt-in-your-mouth texture.
– ¾ cup unsalted butter, cold and cubed – Cold butter creates flakiness; avoid melted butter.
– Pinch of salt – Balances sweetness.
For the Filling
– 4 large eggs – Use room temperature for smooth emulsion.
– 1 ½ cups granulated sugar – Dissolves completely for a silky curd.
– ¼ cup all-purpose flour – Thickens the custard without cornstarch grittiness.
– ⅔ cup fresh lemon juice – Bottled juice lacks brightness; zest optional for extra tang.
– Powdered sugar for dusting – Adds a snowy finish.
Kitchen Tools
– 9×13-inch baking pan (metal for even browning)
– Parchment paper (easy lift-out)
– Mixing bowls, whisk, citrus juicer, and fine-mesh strainer (to remove seeds and zest bits)
– Cooling rack
Substitutions
– Gluten-free: Use 1:1 gluten-free flour blend with xanthan gum.
– Dairy-free: Substitute butter with vegan butter (e.g., Earth Balance).
Prep Time & Cooking Schedule

– Prep time: 20 minutes (crust pressing + filling whisking)
– Bake time for crust: 20 minutes at 350°F (until light golden)
– Bake time for filled bars: 25 minutes at 350°F (until set with slight jiggle)
– Cooling time: 1 hour at room temperature, then 2 hours in the refrigerator
Planning tip: Lemon bars need at least 3 hours total from start to slicing, so make them in the morning for an afternoon treat or the night before serving.
Step-by-Step Instructions

1. Preheat oven to 350°F (175°C). Line your 9×13 pan with parchment paper, leaving overhang on two sides.
2. Make the crust: In a bowl, whisk flour, powdered sugar, and salt. Cut in cold butter with a pastry blender or your fingers until mixture resembles coarse meal. Press evenly into prepared pan (use a flat-bottomed glass for smooth surface). Prick crust with a fork to prevent bubbling. Bake 20 minutes until edges lightly golden.
3. Prepare the filling: While crust bakes, whisk eggs and sugar until thick and pale (about 2 minutes). Add flour and whisk until smooth. Slowly stream in lemon juice while whisking continuously to avoid curdling. Strain through a fine-mesh sieve into a clean bowl (removes any coagulated egg or zest bits).
4. Assemble and bake: Pour filling over hot crust (do not let crust cool completely – the heat helps the curd set evenly). Bake 25 minutes until filling is set around edges but still jiggles slightly in the center. The internal temperature of the custard should reach 170°F for safe egg set.
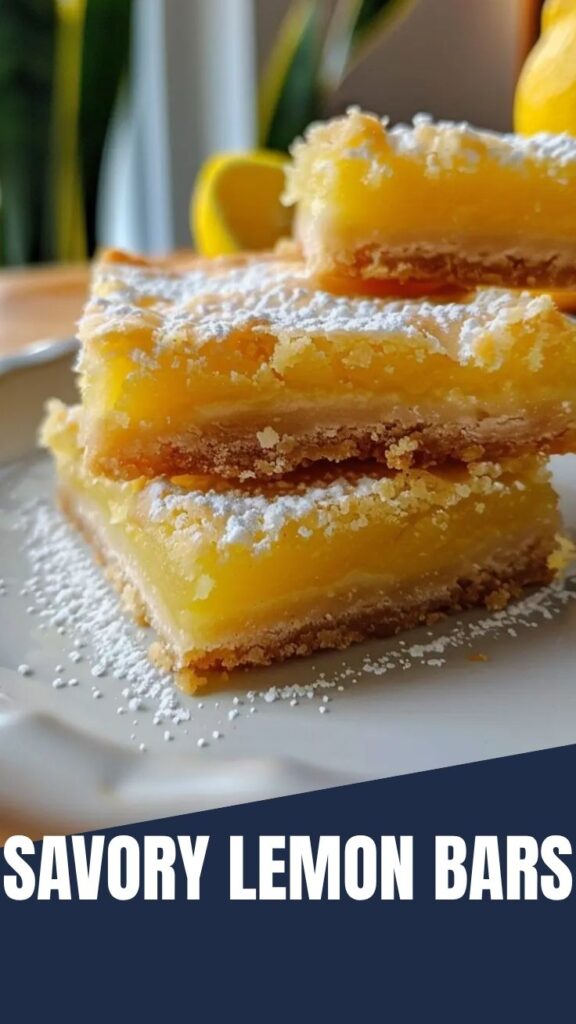
5. Cool completely – first on a wire rack for 1 hour, then refrigerate for 2 hours (this allows the custard to firm for clean slices). Dust generously with powdered sugar before cutting with a sharp, wet knife.
Pro tip: For extra tartness, add 1 tablespoon of lemon zest to the filling. This simple riff transforms a classic lemon bars recipe into a standout lemon dessert that cuts through sweetness perfectly.
Nutritional Benefits & Advantages
Lemon bars offer more than just blissful flavor. Lemons are packed with vitamin C (about 31 mg per lemon), which supports immune health and collagen production. The eggs provide high-quality protein and choline for brain function. While butter and sugar add indulgence, you can enjoy these bars in moderation as a source of fast energy. Compared to many packaged desserts, homemade lemon bars contain no preservatives, artificial colors, or high-fructose corn syrup. The shortbread crust also uses less fat than pie dough, making each serving (1/16th of recipe) approximately 220 calories, 10g fat, 32g carbs, and 3g protein.
Tips, Variations & Cooking Advice
– Flavor twist: Swap ¼ cup lemon juice for lime or orange juice for a citrus medley. Add 1 tsp vanilla or thyme-infused sugar to the crust.
– Dietary adaptations: For a vegan version, use aquafaba (3 tbsp per egg) and coconut oil instead of butter. The texture will be slightly softer but still delicious.
– Portion changes: Bake in an 8×8 pan for thicker bars (increase bake time by 5-7 minutes). For mini bars, use a 9×9 pan and cut into 16 pieces.
– Texture tip: To avoid a gummy crust, chill the pressed crust for 10 minutes before baking – this solidifies the butter for a flakier base.
Common Mistakes to Avoid
– Overbaking the filling: A dry, cracked surface means you overbaked. Remove when center still jiggles – it will firm as it cools.
– Soggy crust: If your crust absorbs filling, you may have used warm butter or didn’t pre-bake long enough. Always pre-bake until golden and cool completely before adding filling.
– Sticky cutting: Use a sharp knife wiped clean after each cut, and dust with powdered sugar only after chilling.
– Curdled filling: Pouring lemon juice into hot eggs can scramble them. Always whisk eggs and sugar first, then slowly add juice while whisking.
Storage & Meal Prep Tips
Store lemon bars in an airtight container in the refrigerator for up to 5 days. Do not leave at room temperature for more than 2 hours due to egg content. To freeze, arrange bars in a single layer on a baking sheet, freeze until solid (1 hour), then transfer to a freezer-safe container with parchment between layers. Freeze for up to 3 months. Thaw overnight in the fridge. Avoid reheating – bars are best served cold or at room temperature. For meal prep, bake a full batch on Sunday and slice as needed. The powdered sugar topping will dissolve over time, so dust fresh before serving.
Conclusion
Making lemon bars from scratch is a rewarding process that yields a dessert far superior to anything from a box. The buttery crust, the silky curd, and the final snowy dusting come together in a dessert that is both nostalgic and sophisticated. Remember, the secret to flawless lemon bars lies in patience – proper cooling and chilling are non-negotiable. Whether you serve them as a bright finish to a heavy meal or as a quick afternoon snack, they always impress. And if you’re craving more citrus magic, try our coconut raspberry bars as another stunning lemon dessert variation. Now it’s your turn – grab a lemon, preheat your oven, and create something extraordinary. Share your results in the comments below!
FAQs
1. Can I use bottled lemon juice for lemon bars?
Fresh-squeezed lemon juice delivers the brightest flavor and natural pectin for a better set. Bottled juice often has preservatives that can make the filling taste flat. Stick with fresh for best results.
2. Why did my lemon bars turn out runny?
Runny filling usually means underbaking or too much liquid. Ensure you bake until the edges are set (about 25 minutes) and always use the correct flour-to-juice ratio. Also, don’t skip the refrigerator cooling step.
3. Can I make these gluten-free?
Absolutely. Substitute all-purpose flour with a 1:1 gluten-free baking blend that contains xanthan gum. The crust and filling will work perfectly, though the crust may be slightly more crumbly.
4. How do I get clean slices?
Chill bars for at least 2 hours, then use a long, sharp knife dipped in hot water and wiped dry between cuts. This gives you those bakery-quality edges.
5. My crust is too hard – what went wrong?
Overworking the dough or overbaking the crust can lead to a tough base. Press the crust gently and evenly, and remove from the oven as soon as the edges turn pale golden. Also, use cold butter and minimal handling.