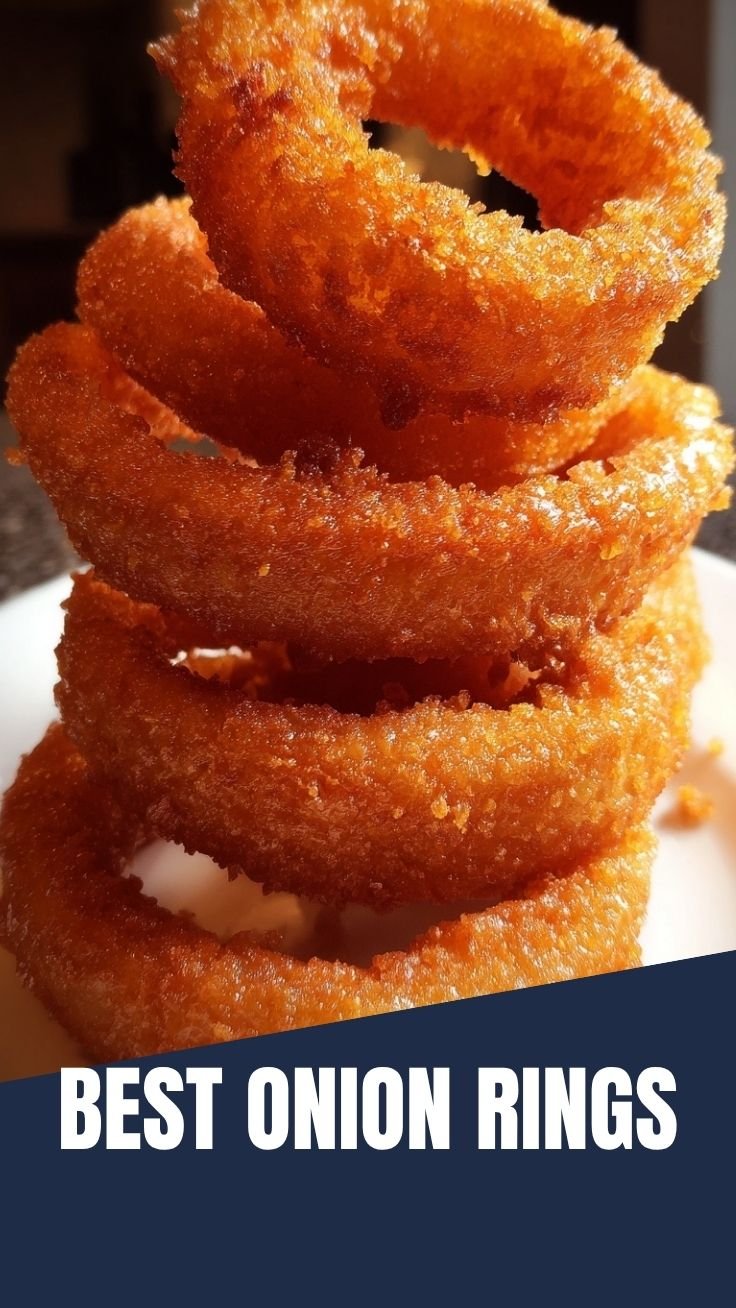
The Ultimate Guide to Perfectly Crispy Onion Rings (Air Fryer & Oven Methods)
There’s nothing quite like the satisfaction of biting into a golden, crunchy onion ring that shatters with every bite. But achieving that irresistible crunch at home often feels like a kitchen gamble—soggy batter, burnt edges, or uneven cooking. Whether you’re a seasoned cook or a beginner, mastering crispy onion rings is easier than you think. This guide covers every detail, from selecting the right onions to troubleshooting common pitfalls. And if you want a lighter, faster option, we’ll also dive into air fryer onion rings for a healthier twist. By the end, you’ll have restaurant-quality results from your own kitchen.
For tried-and-true recipes, check out our trusted versions: Onion Rings (Crispy) and Air Fryer Onion Rings.
—
Ingredients & Kitchen Tools
Ingredients
– 2 large sweet onions (Vidalia or yellow) – slice into ½-inch rings, separate gently.
– 1 cup all-purpose flour – for the dry coating; use gluten-free blend if needed.
– ½ cup cornstarch – adds extra crispness.
– 1 tsp baking powder – creates airy batter.
– 1 tsp smoked paprika – for color and subtle smokiness.
– ½ tsp garlic powder – enhances savory depth.
– 1 tsp salt – plus more for sprinkling after cooking.
– ½ tsp black pepper – freshly ground.
– 1 large egg – binds the batter.
– 1 cup buttermilk (or 1 cup milk + 1 tbsp lemon juice) – tenderizes and adds tang.
– Oil for deep-frying (vegetable, canola, or peanut) – if using air fryer, you only need a light spray.
Kitchen Tools & Utensils
– Sharp knife & cutting board – for even rings.
– Large mixing bowls (2) – one for dry mix, one for wet.
– Whisk – to combine batter.
– Deep-fry thermometer – ensures oil stays at 350°F (175°C).
– Baking sheet with wire rack – for holding coated rings before frying.
– Tongs – for safe handling.
– Paper towels – to drain excess oil.
Optional substitutions: Use almond milk + vinegar for dairy-free buttermilk; arrowroot powder can replace cornstarch.
—
Prep Time & Cooking Schedule
– Prep time: 15 minutes (slice onions, mix batter)
– Resting time: 10 minutes (let batter sit for better adhesion)
– Cooking time (deep-fry): 8–10 minutes (4–5 minutes per batch)
– Cooking time (air fryer): 12–15 minutes at 400°F (200°C), flipping halfway
– Total time: approximately 35 minutes
Plan to serve immediately after cooking for maximum crunch. If preparing for a party, keep cooked rings warm on a wire rack in a 200°F oven.
—
Step-by-Step Instructions

1. Slice & Soak – Cut onions into ½-inch rings and separate. Soak in ice water for 10 minutes (removes sharpness and helps batter stick).
2. Prepare Dry Mix – In a bowl, whisk flour, cornstarch, baking powder, paprika, garlic powder, salt, and pepper.
3. Make Batter – In another bowl, beat egg and buttermilk until combined. Slowly add half the dry mix, whisking until smooth. The batter should coat a spoon but not be runny.
4. Coat Rings – Pat onion rings dry with paper towels. Dredge each ring first in the remaining dry mix, then dip into batter, letting excess drip off.
5. Fry or Air Fry – For deep-frying: heat oil to 350°F (175°C). Fry in batches (don’t overcrowd) for 3–4 minutes until golden brown. For air fryer: preheat to 400°F, spray rings with oil, and cook for 10–12 minutes, flipping halfway.
6. Season & Serve – Immediately sprinkle with salt while hot. Serve with ranch dip, ketchup, or spicy mayo.
Key tip: To achieve perfectly crispy onion rings, ensure the oil temperature stays steady—if it drops too low, the batter absorbs oil and turns soggy. If you’re making air fryer onion rings, don’t skip the resting step; letting the batter set for 5 minutes before cooking improves adhesion and crunch.
—
Nutritional Benefits & Advantages
Onions are low in calories (about 60 per cup) and packed with quercetin, an antioxidant that supports heart health and reduces inflammation. By choosing air fryer onion rings, you cut fat content by roughly 50% compared to deep-frying, without sacrificing texture. The buttermilk batter adds calcium and probiotics, while cornstarch provides a gluten-free option for those with sensitivities. Plus, homemade rings avoid the preservatives and trans fats found in frozen versions.
—
Tips, Variations & Cooking Advice
– Flavor twists: Add cayenne or chili powder for heat; swap paprika with curry powder for an Indian-inspired version.
– Alternative cooking methods: Oven-bake at 425°F (220°C) on a greased rack for 15–18 minutes (less crispy but still delicious).
– Dietary adaptations: Use gluten-free flour blend and oat milk for gluten-free/dairy-free rings. For keto, substitute almond flour and skip the cornstarch.
– Portion changes: Slice onions thinner (¼-inch) for crunchy “onion straws” or thicker for jumbo rings.
—
Common Mistakes to Avoid
– Soggy batter – Usually caused by wet rings. Pat onions completely dry before coating.
– Burnt exterior, raw interior – Oil too hot or rings too thick. Maintain 350°F and slice uniformly.
– Batter sliding off – Skip the buttermilk soak? The acid helps cling. Also, double-dip: dry mix, then batter, then dry mix again for extra adhesion.
– Air fryer crowding – Leave space between rings for hot air circulation. Cook in single layers.
– Over-seasoning the batter – Salt draws moisture; season after cooking instead.
—
Storage & Meal Prep Tips
These rings are best eaten fresh, but you can store leftovers:
– Refrigerate: Place in an airtight container lined with paper towels for up to 2 days.
– Freeze: Flash-freeze cooked rings on a baking sheet, then transfer to a freezer bag for up to 1 month.
– Reheat: To restore crunch, use an oven at 375°F (190°C) for 5–7 minutes or an air fryer at 350°F for 3–4 minutes. Avoid microwaving—it turns them rubbery.
For meal prep, slice onions and mix dry ingredients up to 2 days ahead. Batter just before cooking.
—
Conclusion
Mastering crispy onion rings at home is all about temperature control and proper coating techniques. Whether you deep-fry for that classic crunch or opt for air fryer onion rings for a lighter version, the key is to keep things simple and precise. With this guide, you’ll never settle for mediocre rings again. Give it a try, and let us know how your batch turns out in the comments below! For more crispy snacks and dips, explore our other recipes.
—
FAQs
1. Can I use yellow onions instead of sweet?
Yes, but yellow onions are sharper. Soaking in ice water for 15 minutes mellows the bite. Sweet onions (Vidalia) give a milder flavor.
2. Why did my batter turn out too thick or too thin?
Batter should coat a spoon lightly. If too thick, add a tablespoon of milk; if too thin, whisk in a little flour. Let it rest 5 minutes—it will thicken naturally.
3. How do I make air fryer onion rings extra crispy?
Use a light spray of oil on both sides, and don’t overcrowd the basket. Also, add 1 tablespoon of cornstarch to the batter for an extra crunch.
4. Can I make these rings gluten-free?
Absolutely. Replace all-purpose flour with a 1:1 gluten-free flour blend (with xanthan gum) and use gluten-free beer or buttermilk. Cornstarch is already gluten-free.
5. How do I prevent the coating from falling off?
Ensure onions are dry before dipping. Also, try a “double dredge”: dust with dry mix, dip in wet batter, then coat again with dry mix. This locks in the crust.