
The Ultimate Texas Beef Chili Recipe: A Bowl of Bold, Smoky Comfort
Have you ever wondered what separates a good chili from a legendary one? The kind that makes friends text you for the recipe before the bowl is empty? The secret lies in the quality of the beef, the depth of the chiles, and a cooking method that builds layers of flavor over time. Preparing this iconic dish at home isn’t just about saving money—it’s about controlling every ingredient to create a personalized masterpiece that no jar or can can replicate. Mastering the perfect Texas Beef Chili starts with a deep understanding of its core ingredients and techniques, and you’ll find that this hearty meal is the ultimate game-day and cold-weather companion. This version focuses on tender chunks of beef—never ground—simmered in a rich, chile-forward sauce that embodies the Lone Star State’s culinary soul.
Ingredients & Kitchen Tools
For the Chili Base
– 3 lbs beef chuck, cut into 1-inch cubes (preferred over ground beef for authentic texture; look for well-marbled pieces)
– 3 dried ancho chiles, stemmed and seeded (provides deep, smoky sweetness; can substitute with 3 tbsp ancho powder)
– 2 dried guajillo chiles, stemmed and seeded (adds bright, fruity heat; replace with 1 tbsp guajillo powder + 1 tsp cayenne)
– 4 cloves garlic, minced (fresh is non-negotiable for pungency)
– 1 large yellow onion, diced (for savory base; white onion works too)
– 2 tbsp tomato paste (intensifies umami and thickens the sauce)
– 1 can (14.5 oz) diced tomatoes, fire-roasted preferred (adds acidity and body)
– 4 cups beef broth, low-sodium (control salt levels)
– 2 tbsp cumin, ground (essential warm earthiness; toast whole seeds for stronger flavor)
– 1 tbsp smoked paprika (reinforces the chile’s smokiness)
– 2 tsp dried oregano, Mexican preferred (adds floral notes)
– 1 tsp cayenne pepper (adjust for heat tolerance)
– 2 tbsp vegetable oil (for searing; avocado oil works)
– Salt and black pepper (season in layers)
Kitchen Tools Required
– Large heavy-bottomed pot or Dutch oven (distributes heat evenly for long simmering)
– Sharp chef’s knife and cutting board
– Large skillet (if you need extra searing space)
– Wooden spoon or spatula
– Mixing bowls (for rehydrating chiles)
– Tongs (for turning beef)
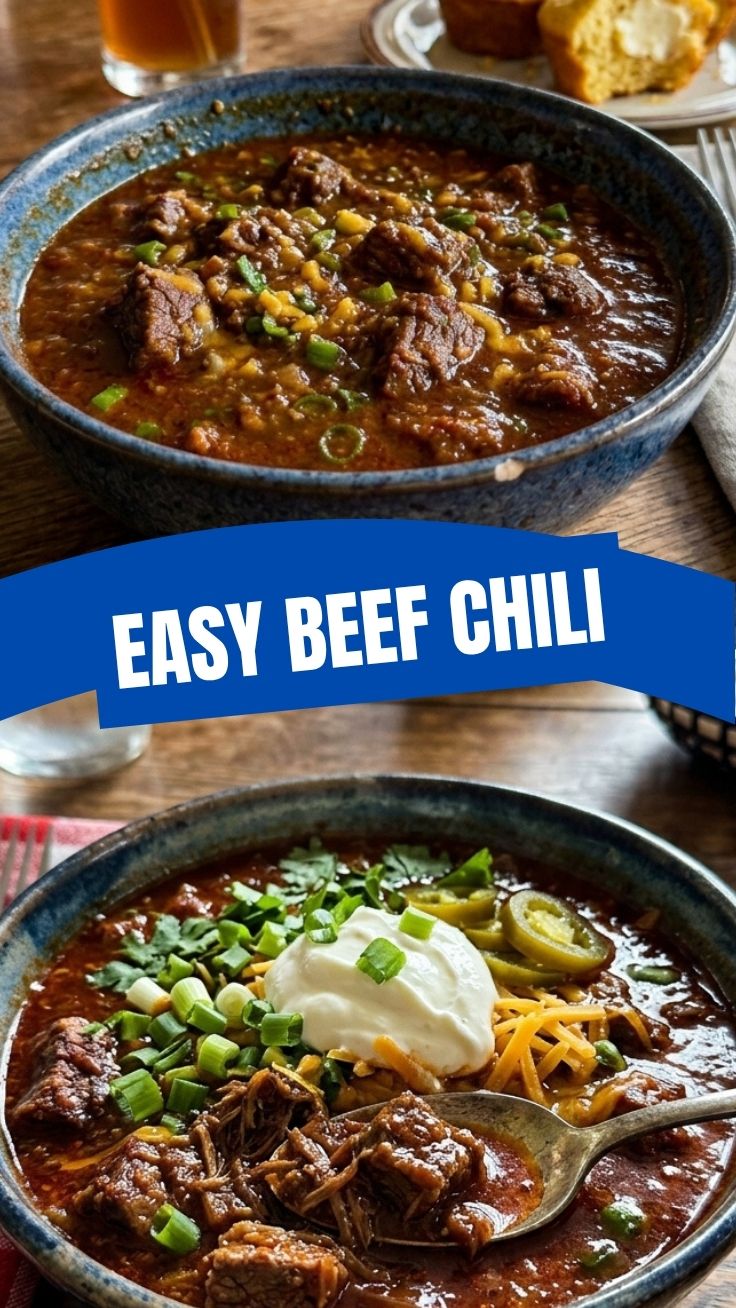
Optional Garnishes & Sides
– Shredded cheddar cheese, sour cream, fresh cilantro, pickled jalapeños, lime wedges, cornbread, or tortilla chips.
Prep Time & Cooking Schedule

– Active Prep Time: 30 minutes (chopping beef, dicing onion, rehydrating chiles)
– Cooking Time: 2 hours 30 minutes (1 hour for searing and building base, 1.5 hours for simmering)
– Resting Time: 20 minutes (optional, allows flavors to meld; chili tastes even better the next day)
– Total Time: Approximately 3 hours
Plan to start this chili at least 3 hours before you intend to serve it. The long, slow simmer is critical for breaking down collagen in the chuck and concentrating flavors. If you’re making it for a game-day party, prepare it a day in advance and reheat—it only improves.
Step-by-Step Instructions
1. Prepare the dried chiles: Place ancho and guajillo chiles in a dry skillet over medium heat. Toast for 30-60 seconds per side until fragrant but not burned (they will darken slightly). Transfer to a bowl, cover with hot water, and let soak for 20 minutes. Drain, then chop roughly. Pro tip: Use gloves when handling chiles to avoid skin irritation; remove seeds carefully to tame heat while keeping flavor.
2. Sear the beef: Pat beef cubes dry with paper towels (moisture prevents browning). Season generously with salt and pepper. Heat 1 tbsp oil in your Dutch oven over medium-high heat until shimmering. Add beef in a single layer—don’t overcrowd (work in two batches if needed). Sear 3-4 minutes per side until deeply browned. Transfer to a plate. Crucial tip: A rich fond (brown bits) on the pot bottom is the foundation of flavor.
3. Sauté aromatics: Reduce heat to medium, add remaining 1 tbsp oil, then the diced onion. Cook 5-7 minutes until softened and translucent. Add garlic, cumin, smoked paprika, and cayenne; stir for 1 minute until fragrant. Add tomato paste and cook 2 minutes, stirring constantly, to caramelize slightly.
4. Combine and simmer: Return beef to pot along with any accumulated juices. Add rehydrated chiles, fire-roasted tomatoes, and beef broth. Stir to combine, scraping the bottom to release fond. Bring to a boil, then reduce heat to low, cover partially, and simmer for 1.5 hours. Key check: Beef should be fork-tender after this time; if not, continue simmering 15-minute increments. As you build the base for this Texas Beef Chili, adjust seasoning at the 1-hour mark—add salt incrementally to prevent over-seasoning as liquids reduce. This traditional Chili con carne relies on patience; a rapid boil will toughen the meat and dull the chile complexity.
5. Adjust and finish: Taste for salt, heat, and smokiness. If thicker chili is desired, mash a few beef cubes against the pot side with a spoon to release starch, or stir in a slurry of 1 tbsp cornstarch + 2 tbsp cold water. Simmer 5 more minutes. Remove from heat and rest for 20 minutes before serving with your favorite garnishes.
Nutritional Benefits & Advantages
This chili isn’t just soul-warming—it packs a nutritional punch. A serving (about 1.5 cups) delivers roughly 35-40g of protein from the beef chuck, supporting muscle repair and satiety. The ancho and guajillo chiles are rich in vitamin C and capsaicin, which may boost metabolism and reduce inflammation. Beef broth provides collagen and minerals like zinc and iron. The dish is naturally low in carbohydrates (under 15g per serving without beans), making it suitable for keto and low-carb diets if you avoid cornbread. Health tip: Use leaner cuts like top round to reduce saturated fat, though chuck ensures the best flavor and texture for slow cooking.
Tips Variations & Cooking Advice
– Mild version: Skip cayenne and remove all seeds from chiles. Add a pinch of sugar to balance acidity.
– Spicy variation: Add 1-2 chipotle peppers in adobo sauce (minced) along with the chiles for smoky heat.
– Bean controversy: While purists argue true Texas chili has no beans, you can add 2 cans of rinsed kidney or pinto beans 20 minutes before serving for a heartier, fiber-rich meal.
– Gluten-free option: Confirm your broth and tomato paste are certified gluten-free—this recipe is naturally gluten-free otherwise.
– Dairy-free garnish: Skip cheese and sour cream; use sliced avocado and fresh cilantro instead.
– Crockpot adaptation: After searing beef and sautéing aromatics, transfer everything to a slow cooker. Cook on low for 6-8 hours, then adjust seasoning.
– Thickener alternatives: Use grated zucchini (adds moisture and body) or masa harina whisked with a bit of water, stirred in during the last 20 minutes.
Common Mistakes to Avoid
– Skipping the sear: Steaming the beef without browning creates a dull, gray chili. Searing is non-negotiable for depth of flavor.
– Overcooking dried chiles: Toasting too long makes them bitter; soaking too short (under 15 minutes) leaves them tough to blend. Follow timing precisely.
– Adding beans early: Beans release starch that thickens the sauce, but if added too early, they can become mushy and break apart. Add after the beef is tender (last 30 minutes).
– Seasoning too late: Salt needs time to penetrate meat fibers. Add the first round during the initial simmer—80% of the total salt—then adjust at the end.
– Using pre-ground spices exclusively: While convenient, fresh-toasted and ground cumin, coriander, or chiles deliver exponentially more aroma and complexity.
Storage & Meal Prep Tips
– Refrigeration: Cool chili completely (use an ice bath or shallow container), then transfer to an airtight container. Refrigerate for up to 4 days. Safety note: Never place hot chili directly in the fridge—it raises internal temperature and risks bacterial growth.
– Freezing: Portion cooled chili into freezer-safe bags or containers (remove as much air as possible). Freeze for up to 3 months. For best texture, freeze without garnishes.
– Reheating: Thaw overnight in the fridge. Reheat gently on the stovetop over medium-low heat, adding a splash of broth or water if thickened too much. Microwave: Cover bowl with a damp paper towel and heat in 1-minute bursts, stirring between. Avoid boiling—it may toughen the beef.
– Meal prep tip: Double the recipe and freeze half. Cook the initial batch with minimal salt; add salt only when reheating to prevent over-seasoning over time.
Conclusion
This Texas Beef Chili is more than a recipe—it’s a lesson in patience and layering. From searing the beef to toasting the chiles, every step builds a foundation of deep, smoky flavor that transforms a pot of meat into a bowl of pure comfort. Whether you serve it with cornbread, over fries, or simply with a spoon, this Chili con carne proves that the best dishes come from understanding when to push and when to let time do the work. Give it a try this weekend, share a photo of your steaming bowl, and let us know in the comments—do you stand with or without beans? The only wrong answer is not making it at all.
FAQs
Can I use ground beef instead of chuck?
Yes, but it won’t create the same hearty, chunky texture. If you must use ground beef, choose 80/20 fat content and brown it deeply, breaking it into larger chunks before adding vegetables. The flavor will still be excellent, but purists might object.
How do I fix chili that’s too spicy?
Stir in a tablespoon of sour cream, Greek yogurt, or a splash of heavy cream. Acidity from lime juice can also cut heat. Alternatively, add more tomato sauce or broth to dilute the spice level.
My chili is too thin—how do I thicken it?
Mash a cup of the chili against the pot side with a potato masher to release starches from the beef. Or make a slurry of 1 tbsp cornstarch + 2 tbsp cold water, stir it in, and simmer 5 minutes. Simmering uncovered for 15-20 minutes also reduces liquid.
Can I make this in an Instant Pot?
Absolutely. Use the Sauté function for searing and cooking aromatics. Add all ingredients plus an extra cup of broth (to account for evaporation). Pressure cook on High for 40 minutes, then Natural Release for 15 minutes. Adjust seasoning before serving.
What’s the best beer to use in this chili?
For deeper flavor, replace 1 cup of broth with a dark beer like a stout or porter (Guinness works well). Avoid hoppy IPAs—they can turn bitter during long cooking. Add the beer when you add tomatoes and let it cook off for 2 minutes before adding broth.
Proven way to grow Texas Beef Chili in 3 steps
Ingredients
Equipment
Method
- Heat olive oil in a large pot or Dutch oven over medium-high heat. Add beef cubes and brown on all sides. Remove beef and set aside.
- Add onion to the pot and cook until softened, about 5 minutes. Stir in garlic and cook for another minute until fragrant.
- Return beef to the pot. Stir in crushed tomatoes, beef broth, chili powder, cumin, oregano, and cayenne pepper (if using). Bring to a simmer, then reduce heat, cover, and cook for at least 2 hours, or until beef is tender. Season with salt and pepper to taste.